RETROFITTING
- NUTRAMIST Fogger Overview
- The Problem With Ebb & Flo (Flood & Drain) Hydroponics
- How To Use The Nutramist To Solve These Problems
- Example 4' x 8'Fog & Drip garden
- Fog & Drip Garden during flood cycle (Intermittent)
- Determining The ProperFog & Drip Cycles
- Additional NUTRAMIST Garden Ideas
This web page details how to retrofit most ebb & flo or flood & drain systems with the Nutramist Fogger to take advantage of Fog and Flood technology. At the bottom of the page are some additional ideas for creating your own custom designs using some of the methods we have experimented with and suggested by other growers.
The following is a quick outline on the considerations you will need to take into account for successful implementation. All tables must be covered to create a completely dark, fog containment area so you must either purchase a cover (if available for your style of table) or make one yourself.
- The edge of your cover must be recessed into the tray to prevent drips!
- Covers must block all light otherwise algae will flourish and compete with roots.
- Covers should provide 2 to 6 inches of space between bottom of grow baskets and tray.
- Grow baskets and cover should be capable of supporting weight of full grown plants.
- Grow baskets between 2 and 3" allow the fastest root growth with 3" being our preference.
The Problem With Ebb & Flo (Flood & Drain) Hydroponics
Ebb&Flo (or Flood & Drain) gardens have been the mainstay of the hydroponics industry for many years due to their low cost, ease of maintenance and effectiveness. Until now, advances in methods of maximizing the productivity of ebb & flow gardens has been limited to "solving" on of their largest inherent flaws, evaporative loss & excessive growing media requirements. Evaporative losses are caused by the large surface area of these tables that are exposed to open air and intense lighting during the daylight cycle. Until now, evaporative losses have contributed to nutrient concentration drifts and pH fluctuations. To reduce this problem, many manufacturers have created covers for their tables which help prevent evaporative loss and also block out light which stops algae growth from negatively impacting root growth. Tray covers also help to create a microclimate with higher humidity in the root zone which also assists overall root health. The other challenge with straight ebb & flo tables is that the plants require a large amount of growing media, be it rockwool cubes, slabs or more recently, coir and soilless mixes in containers. In many instances, this media needs to be replaced after each production run which adds to the cost and complexity of operation.
How To Use The Nutramist To Solve These Problems And Increase Production With TheFog & Drip Method
Converting your hydroponics ebb & flo system to take advantage of NutramistFog & Drip technology is easy. Your crops will quickly realize the benefits of maximized oxygenation and transpiration while your dependence on bulky, expensive and hard to dispose of growing media will be reduced.
EXAMPLE 4' x 8'Fog & Drip GARDEN
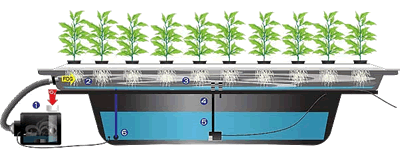 1. The NUTRAMIST fogger nebulizes a small amount of the nutrient solution stored in the reservoir that doubles as a stand. There are six speeds to control the flow of fog on the NUTRAMIST so you can fine tune its output to match your garden's consumption rate..
2. The fog is pumped up into the tray where it feeds the waiting roots in what we will call the "air layer." Fog that condenses simply drips back down to the reservoir below where it can be recirculated.
3. A quiet, submersible pump is timed to gently flood the bottom of the tray every so often to provide larger tap roots with unlimited access to additional nutrient solution.
4. The flood level is easily controlled by the adjustable fittings. Once crops are under way, many growers have reported running the pump continuously during daylight hours at the lowest level, much like an NFT system but with the benefit of the nutrient and Oxygen rich fog to feed the air roots above.
5. The drain tube at the bottom of the tray extends down into the solution to avoid creating the sound of running water, thus keeping your garden completely silent.
6. A reservoir level indicator shows at a glance how much nutrient solution is in the reservoir at any time.
FOG & FLOOD GARDEN DURING FLOOD CYCLE (INTERMITTENT)
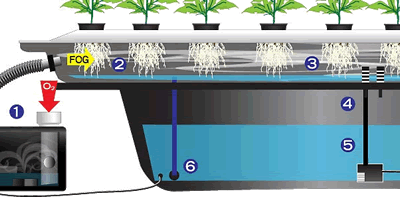 1. The NUTRAMIST fogger continues to provide the air layer of roots with fog during the shallow flood cycle.
2. In this method the tap roots are shallowly bathing in nutrient solution, and the miniscule root hairs above continue to receive fresh Oxygen and nebulized nutrient solution. The grower selects the flood line.
3. The submersible pump can be set to flood on a schedule, using a timer, or run continuously to simulate nutrient film technique along the bottom of the NUTRAMIST tray. Most growers report feeding the tap roots with the flood feature more often as plants grow into their maturity. The combination of fog and flood creates the most Oxygen rich rooting environment ever developed without the need for growing media other than that in which the cuttings or seeds are originally started.
4. The adjustable fill and drain fittings enable the grower to choose the flood depth to best suit their crop's feeding requirement and style of growing.
5. If you plan to expand your NUTRAMIST garden, reservoirs are connected and their levels balanced by using a jumper tube in place of the level indicating tube as pictured in 6.
Determining The ProperFog & Drip Cycles
When plants are young and roots first emerge from your baskets, the fog alone serves to super charge initial root development and a healthy start for your crop. Once plants start to grow and the roots reach the bottom of your tray, it is time to begin intermittently flooding the table to provide tap roots with additional access to water and nutrients beyond what they may receive from the fog by itself. Our research gardens and grower reports alike support the following regimen although results may vary for your own garden and choice of crops. Use this as a guideline only from which to create your own flood cycle times.
1 st. week or when roots first reach bottom of tray, flood for 5 minutes or until tray reaches no more than 1" in depth. It is important to note that if the flood depth reaches the level at which the fog is pumped in through the connection to your table, solution can back flow into your Nutramist and cause a flood in your garden. To insure this does not happen, we set the flood overflow fitting at the same height as the fill fitting so that depth is determined more by the GPH capacity of your pump. Flood time does not need to be more than a five minutes and repeating this cycle every hour seems to work best. It is also important to note than the condensation from the fog will also provide enough moisture on the tray bottom to support growth without much flooding but watch your plants as they will let you know the best method
2nd week or once roots form a solid mat on the bottom of your tray. At this point, growth will increase rapidly and the environmental variables such as temperature, humidity and ambient light will begin to play a major factor in your ongoing cycle. We have found a flood cycle of ten minutes every half hour works well from this point on.
3rd week. At this point, the growth of most crops will really start to explode as root mass below "ground level" and biomass above will really start to fill out. We've found that with most rapidly developing crops, a more frequent flooding for a short amount of time, say 10 minutes of flood, every twenty minutes works well.
Alternative Methods. Some growers report extraordinary results using rooting mats such as those made by General Hydroponics and marketed under the Coco Tek brand. These coco coir mats which come in 4x4 and 4x8 sheets are easily adapted to your tray size. When using such a mat, flood cycles will be impacted, usually reducing their frequency quite substantially. Other means of providing roots with increased CEC (Cation Exchange Capacity) such as a thin bed (1" deep or so) of stone like media such as LECA stone, Silica stone or Hygromite work well too.
Additional NUTRAMIST Garden Ideas:
As illustrated below, there are lots of ways to utilize NUTRAMIST FOGGERS to create your own high performance garden designs.
BELOW
- One of the most popular is to use inexpensive food grade plastic storage bins as growth chambers, fed by a NUTRAMIST. Containers need not be more than 8-12" in depth but must be opaque if using a nutrient solution to prevent stray light from feeding the growth of algae.
- Vertical pipe style gardens are an easy NUTRAMIST retrofit. Use 4-6" PVC pipe with small plants like mesclun lettuce, berries and small flowers.
- Dutch Buckets, while a little more tricky since the covers must be precisely cut, serve as great NUTRAMIST container gardens when you utilize the 1 1/2" drain pipe to pump in fog from below and drain out any excess condensate. These three illustrations attempt to clarify how one might approach this project.
- Bucket systems - Probably one of the least expensive and easy to construct gardens. Lids can be cut to accept any size and number of plant sites.
For the las test updates, take a look at our Grower Talk section of this site.

NUTRAMIST Fogger Overview
 The Nutramist fogger automatically maintains the proper volume of solution within itself for optimal performance by drawing it through a 1/4" piece of tubing (A) which is in turn connected to your reservoir. Fresh air, rich in Oxygen is injected into the Nutramist by the six speed fan (B) allowing growers to control fog delivery and penetration and is pumped out through 1 1/2" flexible plastic tubing (C).
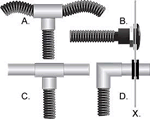 Each Nutramist comes complete with several feet of flexible hose which is plenty for most applications. However, when you wish to split the feed between multiple gardens or use longer runs of tubing, 1 1/4" PVC pipe and fittings work very well for this purpose as the Nutramist vapor distribution hose can easily be glued into the female ends of this commonly sized PVC fitting. (A) depicts a 1 in, 2 out splitter configuration using tubing for flexibility, (B) illustrates using a 1 1/4" bulkhead fitting for connection into a garden (X). (C) Shows yet another way to create a split in the Nutramist output. (D) shows how a 1 11/16" rubber grommet can be used with 1 1/4" PVC pipe in place of the bulkhead fitting. This is a great solution for very shallow tray
Choosing A Cover For Your Table
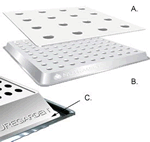 Choosing a cover can be as easy as purchasing one pre made from the same manufacturer of your tray or you may want to make one from scratch using rigid plastic sheeting. (A) Shows a lid made from a simple piece of rigid ABS plastic which has been cut to size to fit neatly inside the lip of the tray it will cover. (B) Is our own custom molded lid setup for propagation with (100) 2" holes cut in. This lid is made specifically to fit our Nutramist garden trays. (C) Details how your lid must fit inside the outer lip of the tray, in a recessed fashion. This will prevent condensation from dripping our around the edge of your tray cover. Some of our customers report using Celotex Foam sheeting as covers which is inexpensive but we have no experience with this product in particular.
FOG & FLOOD UP CLOSE
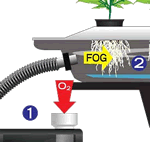 (1) The Nutramist combines a user-adjustable flow of Oxygen rich air with a finely nebulized nutrient solution to provide the ideal environment for the development of air roots which help to maximize metabolization. (2) The thicker tap roots which are responsible for the bulk of solution transport rest on the bottom of the tray and are quenched at user-adjustable intervals using your existing ebb&flo system set to minimal flood depth. This dual zone approach to hydroponics feeding provides all of the benefits of the Nutramist technology